 |
| Grissini with Onion Powder and Parsley |
I started with this recipe and added some onion powder, parsley, and black pepper. There are tons of options for seasonings and I can't wait to try more. We all know that on the HCG diet, seasonings are your best friend!
Here is the nutritional breakdown:
Nutritional Info
- Servings Per Recipe: 48
- Amount Per Serving
- Calories: 22.3
- Total Fat: 0.6 g
- Cholesterol: 0.0 mg
- Sodium: 48.6 mg
- Total Carbs: 3.6 g
- Dietary Fiber: 0.1 g
- Protein: 0.5 g
You Will Need:
- 1/2 cup warm water
- 1 package active dry yeast (equal to 2 1/2 teaspoons of jarred yeast)
- 1 teaspoon sugar
- 1 1/4 cup all purpose flour
- 1/2 cup whole wheat flour
- 2 tablespoons olive oil
- 1 teaspoon sea salt
I prefer to use organic ingredients as it enhances the taste and is better for you, but the choice is yours.
Once you have gathered your ingredients, combine the water with the yeast, sugar, and one-half cup of the all-purpose flour in a large bowl. Set aside for 10 minutes, or until bubbly. If you don't see slight bubbles in your mixture, your yeast may not be active or your water may be too cold (in which case it will just take longer).
Stir in all remaining ingredients. You can also add spices at this point such as parsley, black pepper, or rosemary. Knead until smooth and elastic. This will take about 5 minutes. You may need to add some extra water a few tablespoons at a time. You want your dough to all hold together without being very sticky or damp.
Wash out your bowl and coat it with a thin layer of olive oil. Place the dough in the bowl, cover with plastic wrap to help hold in heat, and place in a warm spot for an hour to rise. Good places include a sunny windows or porches.
 |
| My dough after rising for an hour |
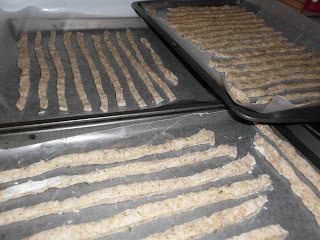
Lightly dust flour on a surface. Remove the dough from the bowl and divide it into four pieces. Roll out (or gently spread with your fingers if you're an amateur like me and you don't have a rolling pin) rectangles that are approximately 4 by 12 inches. Cut the dough lengthwise into 1/3 inch strips. Place the strips about 1/2 inch apart on a greased or parchment paper-covered baking sheet. Repeat with all the remaining dough.
 |
| My bread sticks to be |
Allow the grissini to puff (rise) for 30 minutes. Preheat your oven to 400 degrees.
I ended up with three pans of bread sticks. I started my timer for thirty minutes as soon as I was finished with the first pan, then began baking the first batch when the timer went off.
Bake yours in batches on the top shelf of the oven until lightly browned. This takes about 10 minutes per batch. Make sure to rotate your pan halfway through to ensure even baking. Cool your grissini on a rack (or a piece of parchment paper). Continue baking until all bread sticks are baked.
Allow to cool completely and store in a ziploc bag for freshness. One note here, by the way. These babies are super fragile and with break if you're rough with them.
Be gentle with your grissini!
 |
This recipe yields about 48 of these sticks of awesome. Good luck with yours! Did you come up with any interesting spice variations? Please share below! ^_^
No comments:
Post a Comment